randys blog

How It Works: Spider Gears - Video
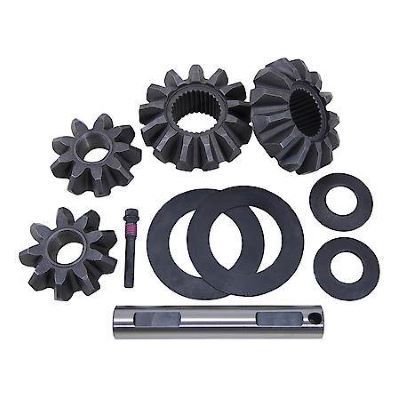
Spider gears are primetime players inside the differential. Also known as satellite gears, spider gears rotate around the side gears in the differential carrier. Side gears may also be referred to as axle gears or planetary gears. To spot spider gears look for the gears with the cross-pin shaft going through them. Read this article in Español What Gears Do The diff’s array of spider and side gears take the rotational energy from the driveshaft and help redirect it outwards to the axles and on to the tires. More importantly, they also play a key role in allowing the tires to rotate smoothly at different speeds when the vehicle is turning. Gears In Trouble Broken spider gears will make a grinding or banging sound when the vehicle is turning because the difference in wheel speeds causes the chatter. You usually won’t hear them when traveling in a straight line because the spider gears remain motionless within the carrier in this instance. But, if they are bad enough, compromised spider gears will make noise even when going straight. When you hear a loud differential think of metal flakes being formed and circulated throughout the unit, usually damaging the vulnerable bearings first. So, noise means trouble. In some cases, the damage may not be the gears themselves. When the spider gears are in motion they rotate on the cross-pin shaft, especially when the vehicle is turning a corner. But there are situations that can cause over spinning and the result can be a heat-scored cross-pin shaft. A common scenario is getting stuck in the mud or snow and free spinning your wheels trying to break free. When this happens, the spider gears can rotate on the cross-pin shaft so quickly that the differential oil is slung away, resulting in metal-on-metal wear. In extreme cases the cross-pin shaft and the gear get so hot that they melt each other, sometimes to the point where they weld themselves together. Damage such as this can not only damage the spider gear set, but also destroy the carrier and ring and pinion gear set. Spider Gear Replacement When replacing spider gears you are, in fact, replacing both the spider gears and the side gears. Over the miles these gears mesh and wear in unison, so dropping in new spider gears with the original side gears can cause an imbalance. Yukon Gear & Axle and USA Standard Gear spider gear kits include two side gears, two pinion gears, a cross pin shaft, a roll pin, and thrust washers. Installation is relatively straightforward. For a more in-depth look, view the accompanying installation video from our YouTube channel. contact us at 866-631-0196 Shop Spider Gear kits

SÍNTOMAS DE DIFERENCIAL DAÑADO. LOS SONIDOS DE LA MUERTE
Si has frecuentado las pistas de competición indudablemente te das cuenta de lo ruidoso que es un hot rod cuando suelta el embrague y luego suelta una carga de engranajes y metal en la pista. En los senderos un vehículo con problemas finalmente se engancha y de repente el torque o el par es demasiado para el diferencial, lo que lleva a la unidad a su desaparición final. Un diferencial también puede tener una muerte lenta y te puede alertar de esa inminente muerte. Un vehículo en movimiento emite muchos diferentes sonidos, la mayoría transmite un estado armonioso. Pero puede haber temblores. A medida que las cosas comienzan a estar mal en un diferencial, hay ruidos que te dan pistas de que algo anda mal y saber qué significan los ruidos te ayudará a determinar cuál es el problema. Con este fin, ofrecemos este resumen de ruidos comunes y su probable punto de origen. Los sonidos de la muerte Cuando estas viajando a velocidades normales de carretera es probable que un sonido como un "zumbido" generado por la descarga a través de la desaceleración se deba a una falla del rodamiento del piñón o una deficiente precarga del rodamiento del piñón. En esta foto se puede ver un verdadero gritón. Una manga aplastada o una falla del rodamiento del piñón provocó que el piñón intentara comerse el carrier/transportador Este mal a menudo se diagnostica como una corona y piñón defectuosa. Bajo una carga positiva cuando se genera un sonido como "gemido" o "aullido", por ejemplo la aceleración está más en línea con el engranaje piñon corona desgastado o defectuoso o un conjunto de engranaje corona piñon que no se ha configurado correctamente. Cuando estas viajando a velocidades superiores a las 20 mph y y usted detecta un sonido “retumbante” que tiende a cambiar de frecuencia mientras el vehículo está girando, puede ser causado por los rodamientos del carrier/transportador desgastados. Pero también podrían ser los rodamientos de una rueda defectuosa. Para confirmar, levante el vehículo en la esquina donde sale el ruido y mueva la llanta. Si hay mucho juego en el aro /llanta lo más probable es que el rodamiento de la rueda sea el culpable. Un sonido como un “chasquido” que se detecta cada pocos pies puede ser un diente roto en su piñon corona. Si recientemente has cambiado tus llantas, comprueba el interior de la rueda para ver si existe un contrapeso expuesto que pueda estar golpeando el cuerpo del amortiguador en cada revolución. Un "golpeteo" más agresivo cuando toma una curva puede ser causado por engranajes satelitales quebrados, una lubricación pobre en los diferenciales de deslizamiento limitado y un embrague gastado en los diferenciales de deslizamiento limitado. Reglas básicas En este proceso, escuchar el sonido es bastante fácil ...rastrear la fuente es la que puede ser complicado. El gran desafío es tratar de diferenciar entre el sonido de un rodamiento defectuoso dentro del diferencial al sonido de un rodamiento de la rueda que está fallando. El sonido es similar. Uno de los factores determinantes es el hecho de que el ruido de los rodamientos de la rueda cambiará con la velocidad de la rueda, pero generalmente no cambiará con las variaciones de carga, por ejemplo la aceleración o la desaceleración, pero el sonido de un diferencial trasero dañado cambiará con la velocidad de la rueda y la carga. Escuche con sus ojos Las fugas también son señales de advertencia. Pueden ser precursores de problemas o el resultado de problemas. Si bien algo de fluidos debajo del vehículo puede ser parte de la condensación del funcionamiento normal, notar goteos rojizos puede ser un signo de una fuga de líquido de transmisión. Un sello o junta dañada puede robarte esa lubricación vital, lo que resulta en partes internas sobrecalentadas y secas así como fallas inminentes. La conclusión aquí es que cualquier ruido que venga de su tren motriz, ya sea que pueda ubicar la fuente o no, es un asunto serio. Rastrear la causa es fundamental para evitar daños más graves y reparaciones más costosas. Para obtener más información sobre los sonidos de la muerte, consulte el video de identificación del ruido de la corona y piñón que lo acompaña. El video está en inglés pero hemos realizado la traducción en español como veras esta en la parte abajo. Fuente original del artículo en inglés: The Sounds Of Death: A Failing Differential Story Gracias por tomarse el tiempo para ver los consejos técnicos de Yukon. Hoy vamos a discutir cómo identificar el ruido de los engranajes del diferencial, dentro del diferencial, hay muchas formas diferentes de acercarse al ruido, pero hoy hablaremos del ruido de los engranajes durante desaceleración. La causa número uno del ruido del engranaje de desaceleración es la pérdida de la precarga del rodamiento del piñón. Cuando sus rodamientos están presionados en su manga de aplastamiento, se sienta entre ellos y crea tensión en los rodamientos internos y externos esa precarga los puede dañar. Por último cuando estás conduciendo por la carretera, una tuerca del piñón se suelta, dentro del espacio de la carcasa tendrás esos rodamientos moviéndose alrededor del eje, esto creará un ruido y desaceleración por permitir a los engranajes moverse mucho por dentro. si se encuentra con esto, tendrá que desarmarlo, reevaluar y de nuevo configurar su precarga además asegúrese de que están dentro de las especificaciones. Gracias por ver este consejo técnico de Yukon sobre cómo identificar el ruido de los engranajes.
The Sounds Of Death: A Failing Differential Story
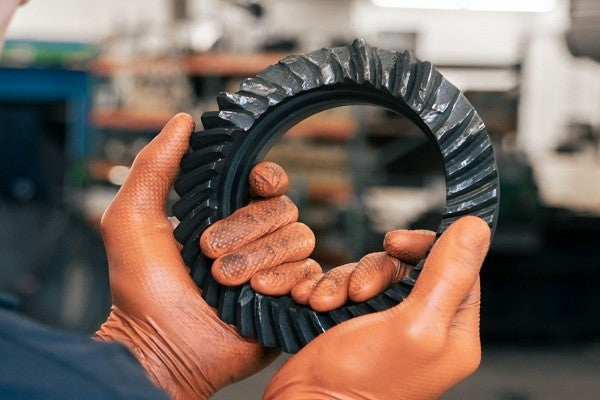
Breaking a differential can be a sudden, horrific event. If you’ve haunted the drag strip you’ve undoubtedly seen the loud, fully cammed hot rod drop the clutch then drop a load of gears and metal on the track. Out on the trail, a struggling rig finally hooks up and the sudden torque is too much for the diff, grenading the unit to its ultimate demise. Read this article in Español A differential can also die slowly and alert you to its impending doom. A vehicle in motion makes many different sounds, most are relaying a harmonious state of being. But there can be tremors in The Force. As things start going sideways in a differential there are noises that serve as clues to what’s happening and knowing the what the noises mean will help you determine what may be wrong. To this end, we are offering this rundown of common noises and their likely point of origin. The Sounds Of Death A “whirring” sound generated by unloading via deceleration from most any regular road speed can likely be traced to pinion bearing failure or poor pinion bearing preload. This malady is often diagnosed as a bad ring and pinion gear. Generating a “whine” or “howling” sound under positive load i.e. acceleration is more in line with a worn or failing ring and pinion gear or a ring and pinion gear set that has not been setup correctly. If you detect a “rumbling” sound at speeds above 20 mph that tends to change frequency while the vehicle is turning it may be caused by worn carrier bearings. But it could also be bad wheel bearings. To confirm, jack up the vehicle at the offending corner and shake the tire. If there is a lot of play in the wheel/tire, the wheel bearing is most likely the culprit. [At Left: Here’s a real screamer. Crush sleeve or pinion bearing failure resulted in the pinion gear trying to eat the carrier.] A regular rhythmic “clunking” or “clicking” detected every few feet may be a broken tooth on your ring or pinion gear. If you have recently swapped on new rolling stock, check the inside of the wheel for an exposed clip-on external wheel weight that may be hitting the shock body on every revolution. A more aggressing “clunking” that borders on “banging” that happens when cornering may be caused by broken spider gears, poorly lubricated limited slip differential or positraction units, or worn clutch packs in limited slip differential or positraction units. Basic Ground Rules In this process hearing the sound is easy enough… it’s tracing the source that gets tricky. The big challenge is discerning a failing bearing within the diff to a wheel bearing that is going south. The sound is similar. One of the determining factors is the fact that the wheel bearing noise will change with wheel speed but usually will not change with load variations i.e. acceleration or deceleration but the sound from a wounded rear differential will change with wheel speed and load. Listen with Your Eyes Leaks are warning signs too. They can be precursors to trouble or the result of trouble. While some fluid under the vehicle can be part of condensation from normal operation, noticing reddish drips can be a sign of leaking transmission fluid. A compromised seal or gasket steals away vital lubrication resulting in dry, overheated internals and impending failure. The bottom line here is any noise emanating from your drivetrain, whether you can locate its root source on not, is serious business. Tracking down the cause is critical to prevent more serious damage and more expensive repairs. For more insight into the Sounds of Death, check out the accompanying Identifying Ring and Pinion Gear Noise video.

How It Works: RPM Calculator
An RPM Calculator is especially valuable to those considering jumping to a bigger tire, altering their vehicle’s performance by changing ring and pinion gears, or satisfying a curiosity about their current setup. The calculator determines your engine rpm at a selected vehicle speed. What You Need to Know The RPM Calculator requires the vehicle’s gear ratio and tire height to make its calculations. Your stock gear ratio can be researched online, it may be in your vehicle’s owner’s manual, or on a tag affixed to the differential cover. If your ring and pinion gears are at hand you can count the teeth on each and use our Gear Ratio Calculator to determine the ratio. Tire height can be ascertained by another calculator on our site. It uses tire width, tire aspect ratio, a wheel diameter to provide the height in inches. If you’re contemplating upgrading to larger tires like 35, 37, or 40 inchers know that the height on the tire is a classification, not a specification. For instance a 35x12.50-17 Mickey Thompson Baja Boss M/T is 34.6 inches in circumference mounted on a 9.5-inch-wide rim… 34.8 inches in circumference on a 10-inch rim. Some tires can be nearly a half an inch off their classification so you may want to research the tire manufacturer’s website to get the most accurate info. Feeding the Numbers Armed with the correct info, it’s time to feed the ratio and tire height numbers into the calculator, select the vehicle speed you want to tabulate engine rpm at, and press the Solve button. The calculator will display the engine rpm for the selected vehicle speed in four boxes below the calculator. Each box represents a transmission type and takes into consideration how gear reduction within the transmission will impact the final engine speed readings. The boxes are labelled Auto, AOD, Manual, and 5 Speed… simply refer to the box that best matches your transmission type. Using the Calculator for Big-Tire Upgrades Use your stock set-up as a baseline before changing the formula for a larger set of tires. Calculate at a variety of vehicle speeds… especially freeway speeds. Going in you should know what your performance goal is… to replicate stock performance or enhance performance at a given speed, i.e. a trail-only rig that will not see freeway speeds very often or a rock crawler that will not be see the street at all. You will need to pre-figure the tire heights of all the tires you are considering upgrading to and have those numbers handy. Then enter your new tire diameter and adjust the gear ratio field, evaluating different gear sets until you find one that best matches your expectations. Make note of the number in the gear ratio box and you’re ready to shop ring and pinion gear sets. Yukon Re-Gear Kits Going big-tire is not as simple as bolting on those 40 inchers and hitting the road. There are cascading effects at work. Big tires impact acceleration, freeway cruising, towing capability, and many aspects of off-road performance. Yukon Re-Gear Kits allow you to restore or enhance the performance of your truck and reap the traction benefits of big tires. It’s a win-win.
How It Works: Gear Oil & Limited Slip Additives
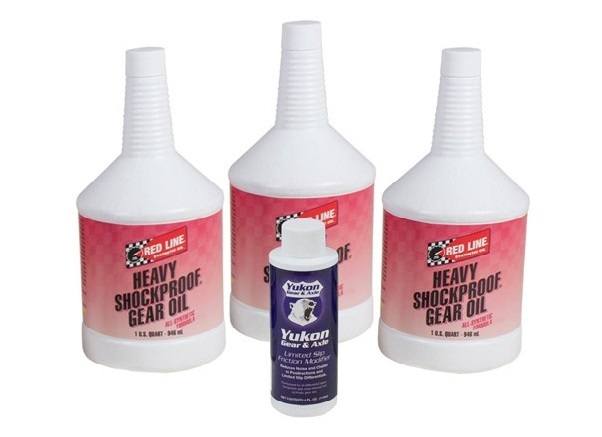
Gear oil keeps components such as the ring and pinion gear set, spider and side gears, limited slip differentials, axles, bearings, and the like lubricated and running smooth. Friction modifiers are additives that improve the performance and efficiency of clutch style limited slip differentials. Understanding how these vital products work is key to properly maintaining your driveline so it performs in the harshest of conditions and lasts for years to come. Read this article in Español Differential Oil By The Numbers Yukon recommends non-synthetic 80W-90 GL-5 gear oil in all differentials. Oil is rated by its viscosity value. Take a multi-grade oil like an 80W90… The 80W is the viscosity value in the winter, denoted by the W, or more precisely at 0 degrees F. So, an 80W oil is more viscous than a 60W oil at 0 degrees. The second number, 90, refers to the oil’s viscosity rating at 212 degrees F, again a higher number will be more viscous at operating temperature. These numbers are also a function of thickness. So, an 80W oil is thicker than a 60W oil. Multi-grade oils are blended with polymers that slow the rate of thinning as temperatures rise while also slowing the rate of thickening as the mercury falls, determining the viscosity range of the oil. Generally speaking a thinner oil will circulate faster through the differential (or engine for motor oil) during a cold start. Conversely, a thicker oil will protect better when the diff gears generate higher temperatures. The "GL-5" designation identifies how much Sulphur-based friction modifier is present in the oil. This chemical modifier helps the oil function under extreme pressure… like in an LSD. Note: Because of its Sulfur content GL-5 oil is meant to be used on hypoid gears in differentials only; it is too corrosive to be used in transmissions, which require a milder GL-4 formulation because they contain soft metal parts. Yukon offers a number of gear oils in a variety of viscosities and in synthetic and non-synthetic blends. Stand-Alone Friction Modifiers Yukon Friction Modifier Additives are used when more clamping force is needed. This type of product is for clutch-type differentials like the Yukon Dura Grip only, not gear-driven limited slips like our Spartan Helical LSD. Friction modifiers are all about annoying chatter. Yukon Friction Modifier Additive guards against abnormal clutch engagement and/or disengagement (source of the chatter), ensuring the optimal friction characteristics between clutch discs are maintained. These additives can be used to compensate for worn clutches or to “tune” the performance of the clutch packs for a specific application like road racing or vehicles that see a lot of track days. It should be noted that is our own proprietary formula designed specifically for the composite clutches in Yukon LSDs. If you run a Dura Grip, do not use parts store grade modifiers because they are formulated for OEM paper-style clutches. With about one-fifth the abrasive properties these store-bought products will perform like watered down versions of our stuff. These products are vital to the proper upkeep of your differential and knowing how they’re rated and how they do their job is critical to making informed maintenance decisions for your vehicle. Shop Oil & Additives
Subscribe To Our Newsletter
Sign up & unlock 5% off. Get news on insider deals, product releases, and expert advice.